Create personal AI Agent - 5
အရင် တစ်ပါတ်က Ollama နဲ့ local LLM တွေကို စမ်းဖို့ ပြောပြီးပြီမို့ ဒီတစ်ပါတ် vLLM Inference ကို သုံးပြီး LLM ကို စမ်းကြည့်ရအောင်ပါ။
ပထမဆုံး Ollama နဲ့ vLLM ဘာကွာလဲ မေးရင် Ollama က graphic card မရှိတဲ့ laptop မှာတောင် သုံးလို့ ရအောင် ရည်ရွယ်ထုတ်လုပ်ထားတာဖြစ်ပြီး vLLM ကတော့ performance နဲ့ multi-concurrent users သုံးလို့ ရတဲ့ဘက်ကို ဦးစားပေးထားတာပါ။ ဒါကြောင့် vLLM က Production Grade လို့ ပြောလို့ ရပြီး Ollama ကတော့ Research Grade လို့ ပြောလို့ ရပါတယ်။
အလုပ်လုပ်ပုံအပေါ်မူတည်ပြီး ကွာတဲ့ အချက်က vLLM က High Throughput ကို ဦးစားပေးထားတာမို့ စပြီး Run တာနဲ့ အဲဒီ Model ကို VRAM ပေါ်မှာ အဆင်သင့်တွက်ချက်ဖို့ ဖြန့်တင်ထားလိုက်တာကြောင့် Ollama လို Model တစ်ခုပြီး တစ်ခု တင်လိုက် ချလိုက် မလုပ်ပေးတော့ပါဘူး။
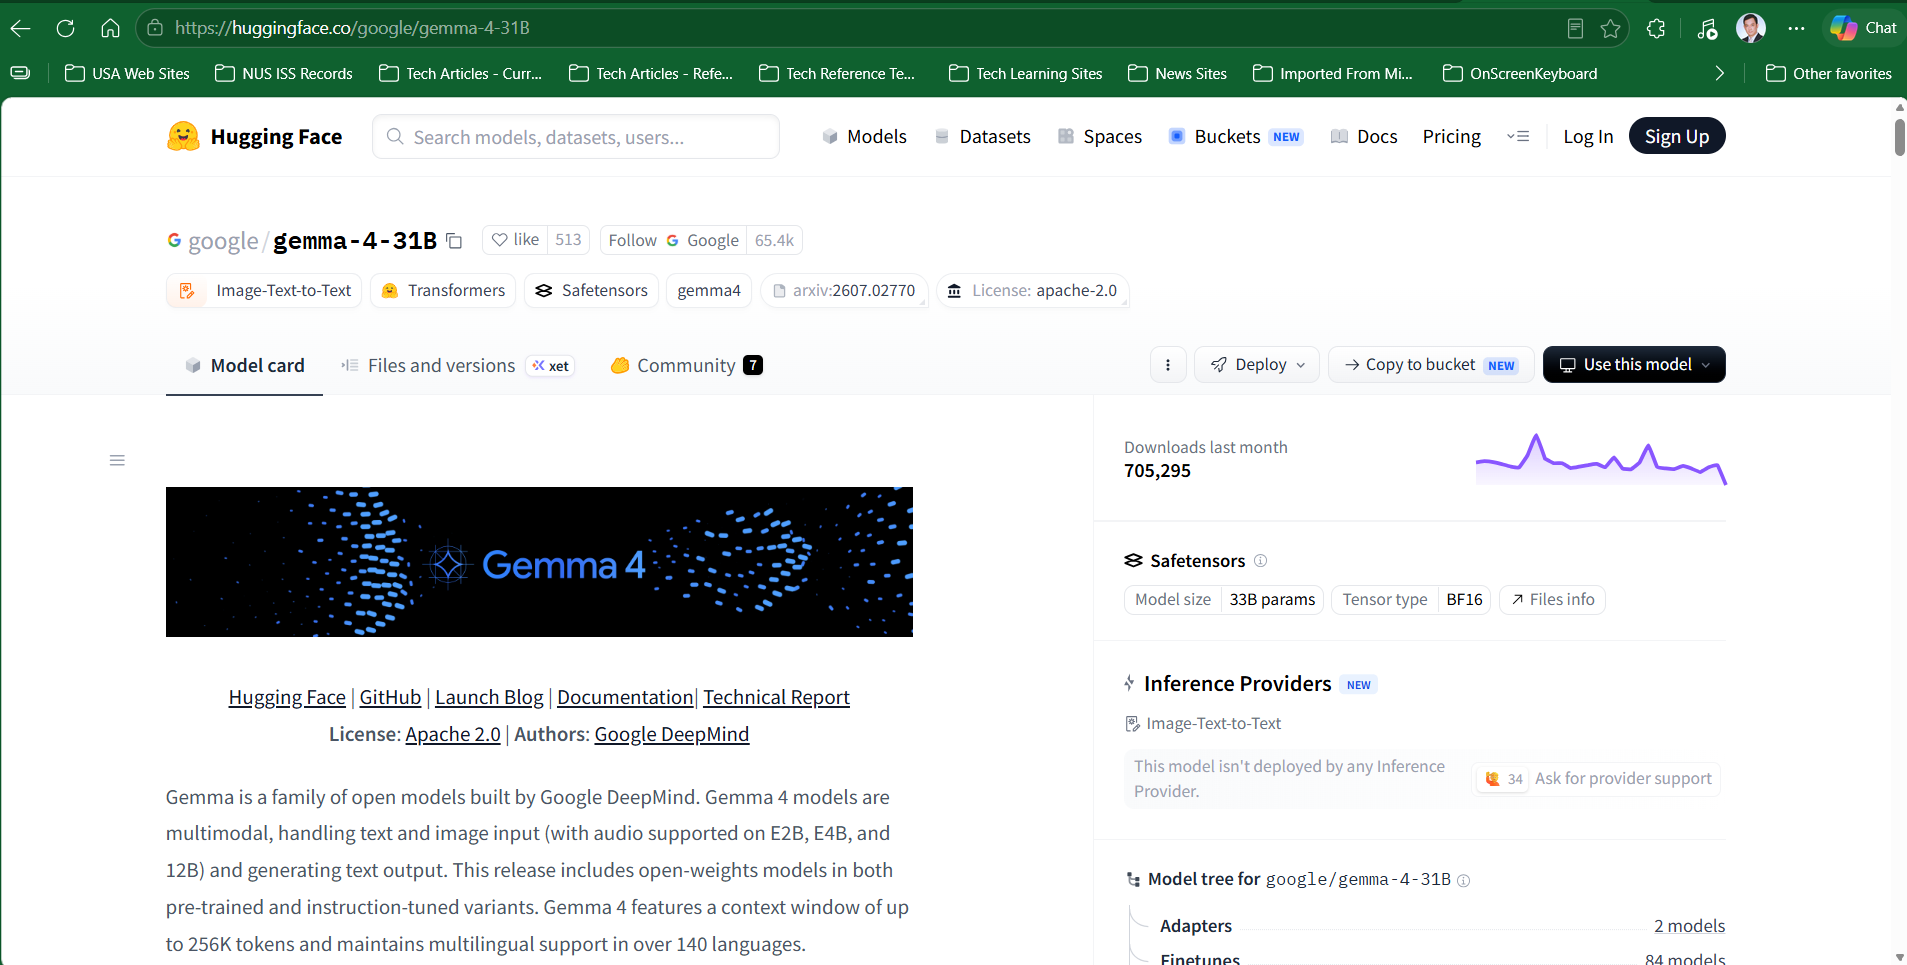
ဒါပေမယ့် vLLM ကို install လုပ်ဖို့ graphic card ကောင်းကောင်းရှိဖို့ လိုပါတယ်။ ဒီနေ့ စမ်းသပ်မှုမှာတော့ Dell Bizon AI Workstation 2 NVIDIA RTX 3090 GPUs ကို သုံးပြီး Google ရဲ့ Gemma4:31B model ကို စမ်းမှာပါ။ လိုက်ပြီး စမ်းမယ့်သူတွေကတော့ ကိုယ့်ရဲ့ PC/Laptop ရဲ့ Graphic Card ပေါ်မှာ မူတည်ပြီး Model သေးတာကို ရွေးပါ။
LLM Size ကို ဘယ်လိုရွေးမလဲ
အကြမ်းဖျဥ်းကတော့ Model ရဲ့ Weight Memory ရယ် KV - Key Value Cache Memory ရယ် Runtime Overhead ရယ် စုစုပေါင်း တန်ဘိုးနဲ့ တွက်ပါတယ်။
ဆိုကြပါစို့ Model ရဲ့ Weight Memory က 16 GB, KV Cache Memory က 4 GB, Runtime Overhead က 4 GB ဆိုရင် စုစုပေါင်း 24 GB ဖြစ်နေပြီမို့ အနည်းဆုံး VRAM 24GB ရှိတဲ့ GPU (ဥပမာ RTX 3090 / 4090) မှ အဆင်ပြေမယ်ဆိုတဲ့ သဘောပေါ့။
Model Weight Memory
ဒီနေရာမှာ Weight Memory ဘယ်လိုတွက်လဲဆိုရင် Model ကို Quantization (ချုံ့ထားခြင်း) ဘယ်လိုလုပ်ထားလဲဆိုတဲ့ အပေါ်မှာ မူတည်ပါတယ်။ အကြမ်းဖျဥ်းကတော့ Parameter Count ရယ် Bits per Weight ရယ်ရဲ့ မြှောက်လဒ်ကို 8 နဲ့ စားပြီး တွက်ပါတယ်.
Model weight memory ≈ Parameter count × Bits per weight ÷ 8
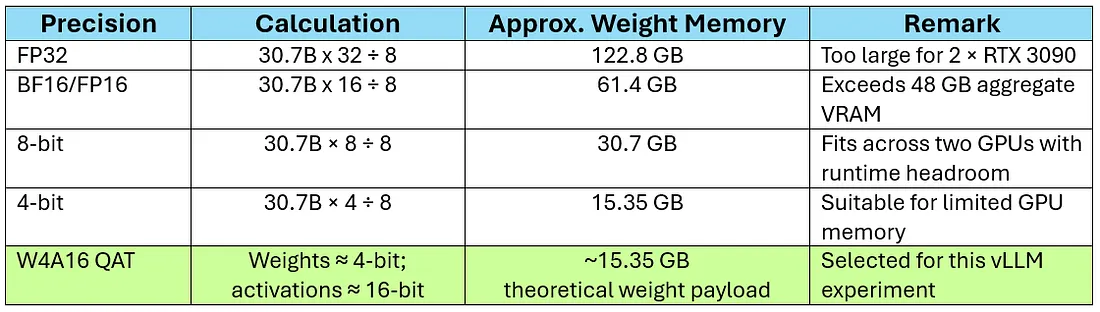
- FP16 / BF16 (Unquantized): ချုံ့မထားတဲ့ မူရင်း Model ဖြစ်ပြီး 1 Parameter မှာ 2 Bytes (16 bits) သုံးပါတယ်။ ဒါကြောင့် 31B Model ဆိုရင် Weight တစ်ခုတည်းတင် 62 GB လောက် VRAM လိုပါတယ်။
- INT4 / Q4 (Quantized): Local deployment တွေအတွက် ချုံ့ထားတာဖြစ်ပြီး 1 Parameter မှာ 0.5 Byte (4 bits) ပဲ သုံးပါတယ်။ ဒါကြောင့် 31B Model ရဲ့ Weight ဟာ 15.5 GB မှ 18 GB ဝန်းကျင်ပဲ လိုတော့တာ ဖြစ်ပါတယ်။
အောက်က ဇယားမှာ 30.7 ဘီလျံ parameters ရှိတဲ့ Google ရဲ့ Gemma4:31B Model ကို မတူညီတဲ့ Precision တွေ သူတို့ရဲ့ Quantization အပေါ်မူတည်ပြီး လိုအပ်မယ့် Weight Memory တွေကို တွက်ပြထားပါတယ်။ သီအိုရီအရ ခန့်မှန်တဲ့ သဘောပေါ့။
KV Cache Memory
KV Cache Memory ဆိုတာ Model ရဲ့ Context Length နဲ့ သက်ဆိုင်တဲ့ Key-Value Cache Memory ပါ။ ပုံမှန် Model တွေရဲ့ Context Length 4K to 16K Token အတွက် 1GB ကနေ 4GB လောက် လိုတတ်ပါတယ်။
Runtime Overhead
Runtime Overhead ဆိုတာ Model ကို စ Run တာနဲ့ GPU VRAM ပေါ်မှာ အလိုအလျောက် နေရာယူသွားတဲ့ ယာယီ Memory တွေပေါ့။
ဒါတွေက Computer Science သွားမယ့် သူတွေသာ သိထားဖို့လိုတာဖြစ်ပြီး ကျန်တဲ့သူတွေကတော့ Google တို့ ChatGPT တို့မှာ ငါ့ VRAM က ဘယ်လောက်ရှိတယ်၊ vLLM နဲ့ Gemma4 ဘယ် အမျိုးအစားကို သုံးလို့ ရမလဲ ဆိုပြီးသာ တွက်ခိုင်းလိုက်ပါ။
Model တွေကို စဥ်းစားတဲ့ အခါ ကိုယ့် လိုအပ်ချက်အတွက် ဘာလုပ်ပေးနိုင်တာလဲ ဆိုတာလဲ ကြည့်ဖို့ လိုတယ်။ တချို့ Model တွေက Text Generation လုပ်တယ်၊ တချို့ Image to Text, Text to Image, Text to Speech, Text to Video တွေ လုပ်နိုင်ပြီး Model အကြီးတွေကတော့ အကုန် လုပ်နိုင်ကြတာလဲ ရှိတယ်။
Gemma4:31B with vLLM Deploy on Container
Model ရွေးပြီးရင် vLLM ကို Docker Container ပေါ်မှာ Deploy လုပ်လို့ ရပါပြီ။ အောက်မှာ Portainer Stack မှာ Run ဖို့ YAML ကို ပေးထားပါတယ်။
services:
  vllm-gemma4-31b:
    image: vllm/vllm-openai:latest
    container_name: vllm-gemma4-31b
    restart: unless-stopped
    ports:
      - "8000:8000"
    volumes:
      - /data/vllm-gemma4-31b/huggingface:/root/.cache/huggingface
      - /data/vllm-gemma4-31b/templates:/templates:ro
    environment:
      - HF_TOKEN=${HF_TOKEN}
    ipc: host
    entrypoint: ["/bin/bash", "-c"]
    command:
      - >
        pip install --no-cache-dir transformers==5.14.1 &&
        vllm serve google/gemma-4-31B-it-qat-w4a16-ct
        --tensor-parallel-size=2
        --gpu-memory-utilization=0.80
        --max-model-len=32768
        --enable-auto-tool-choice
        --tool-call-parser=gemma4
        --reasoning-parser=gemma4
        --chat-template=/templates/tool_chat_template_gemma4.jinja
        --host=0.0.0.0
        --port=8000
    networks:
      - dev-net
    deploy:
      resources:
        reservations:
          devices:
            - driver: nvidia
              count: all
              capabilities: [gpu]
networks:
  dev-net:
    external: true
Parameter တွေရဲ့ အဓိပ္ပါယ်တွေကို အောက်က ဇယားမှာ ရှင်းပြပေးထားတယ်၊ ကြိုးစားပြီး နားလည်အောင် ဖတ်ကြည့်ပေါ့။ အသေးစိတ်နားလည်ဖို့ မလိုပါဘူး။ အဓိက အရေးကြီးတဲ့ Parameter တွေကို သဘောတရားလောက် သိရင် ရပါပြီ။
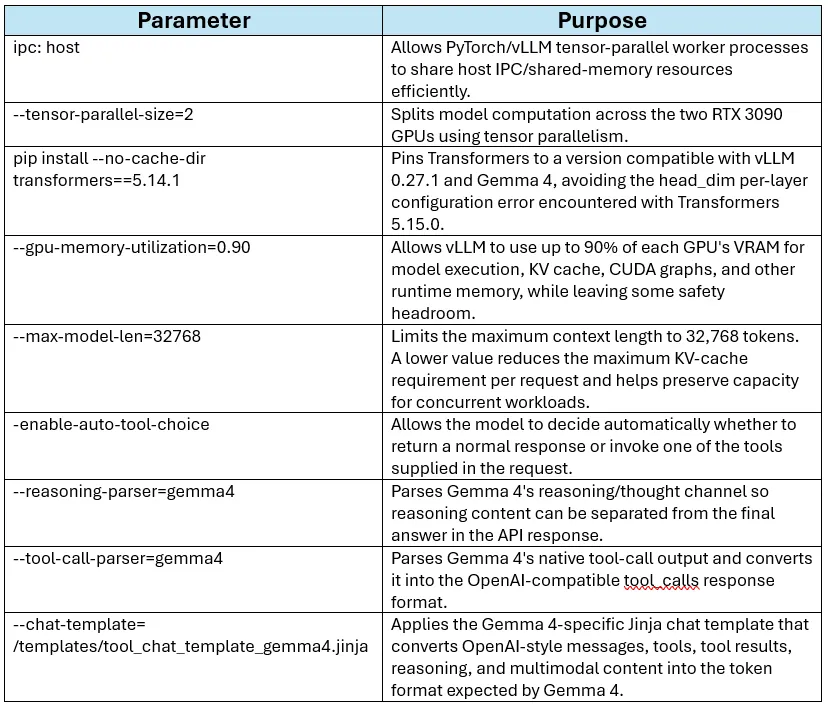
ဥပမာ gpu-memory-utilization=0.9 ဆိုတာ ကျွန်တော့် ဆာဗာမှာ ရှိတဲ့ GPU graphic card VRAM ရဲ့ ၉၀% ကိုပဲ သုံးဖို့ သတ်မှတ်တာ။
max-model-len=32768 ဆိုတာ LLM ကို run တဲ့ အခါ သူ့ရဲ့ အမေးရော အဖြေရော စုစုပေါင်း စကားလုံး ၂ သောင်းခွဲ ဝန်းကျင်လို့ သတ်မှတ်ပေးတာ။ 1 token က 0.7 words လောက်ရှိတာမို့ အင်္ဂလိပ်စာလုံးရေနဲ့ဆို စာလုံးရေ ၄ လုံးလောက်ပေါ့။ Token size က KV-Cache အပေါ်မူတည်တာမို့ ကိုယ်ရဲ့ Server က Support လုပ်နိုင်ရင် LLM Model ရဲ့ Maximum Size အထိ ထားလို့ ရတယ်။ တကယ်ဆိုရင် Google Gemma4:31b က Token Size ၂ သိန်းကျော်ထိ သုံးခွင့်ပေးထားတယ်။ 256K context window ပေါ့။ အကြမ်းဖျဥ်းအားဖြင့် တစ်ကြိမ် အမေးအဖြေလုပ်တိုင်း စာမျက်နှာ ၅၀၀ ပါ စာအုပ်တစ်အုပ်စာအထိ လုပ်နိုင်တဲ့ သဘော။ ကျွန်တော့် Server ရဲ့ Hardware Limit အရ စာလုံးရေ ၃ သောင်းလောက်ကို ကန့်သထားရတာ။
enable-auto-tool-choice ဆိုတာ LLM Model ကို MCP Tool လို Function Call တွေနဲ့ ချိတ်ဆက်ထားရင် သူ့ကို လိုအပ်သလို ဆုံးဖြတ်ပြီး Tool တွေကို ခေါ်သုံးဖို့ ပြောတာ။
reasoning-parser=gemma4 နဲ့ tool-call-parser=gemma4 ဆိုတာတွေက LLM က response ပြန်တဲ့ အခါ သူစဥ်းစားပုံ စဥ်းစားနည်းနဲ့ tool တွေရဲ့ တုန့်ပြန်ပုံတွေကိုပါ OpenAI format နဲ့ Response ထဲမှာ ထည့်ပေးဖို့ ပြောတာ။ ဒါကလည်း Reasoning နဲ့ Tool Calling ပါတဲ့ Model တွေမှာပဲ သုံးလို့ရတဲ့ ဟာတွေပါ။
အဲလောက်တီးမိခေါက်မိဖြစ်ရင် လုံလောက်ပါတယ်။
Gemma4 and Transformers 5.14.1
YAML ထဲမှာ ပါတဲ့ pip install --no-cache-dir transformers==5.14.1 && vllm serve ဆိုတာက Gemma4 ကို vLLM နဲ့ deploy လုပ်တဲ့အခါမှာ ကျွန်တော် ကြုံတွေ့ခဲ့ရတဲ့ Version Mismatch Error ကြောင့်ပါ။
vLLM Version 0.27.1 ကို Container မှာ Install လုပ်တဲ့ အခါ vLLM က Transformer ရဲ့ နောက်ဆုံး Version ဖြစ်တဲ့ 5.15.၀ ကို သုံးထားပါတယ်။ ဒါပေမယ့် Google Gemma4 က Transformer 5.14.1 ကို သုံးထားတာပါ။ Transformer 5.14.0 မှာ Heterogeneous Attention Architecture ကို head_dim နဲ့ single global value အဖြစ် သတ်မှတ်တာတဲ့ Configuration ကို ပုံစံ ပြောင်းထားလို့ပါ။ အဲဒါကြောင့် Default Setting အတိုင်း vLLM V0.27.1 ကို Gemma4 နဲ့ Deploy လုပ်ရင် Runtime Error တက်လာတာပါ။
ဒါကလည်း ဗဟုသုတအဖြစ် ကျွန်တော် ကြုံခဲ့ရတဲ့ Error နဲ့ ဘာကြောင့် transformers version ကို သတ်မှတ်ပေးထားတာလဲ ဆိုတာကို ရှင်းပြတာပါ။
အားလုံး မှန်မှန်ကန်ကန် deploy လုပ်လိုက်နိုင်ရင်တော့ Docker logs ကနေ vLLM container ကို ခေါ်ကြည့်လို့ ရပါပြီ။
docker logs vllm-gemma4-31b --tail 100 -f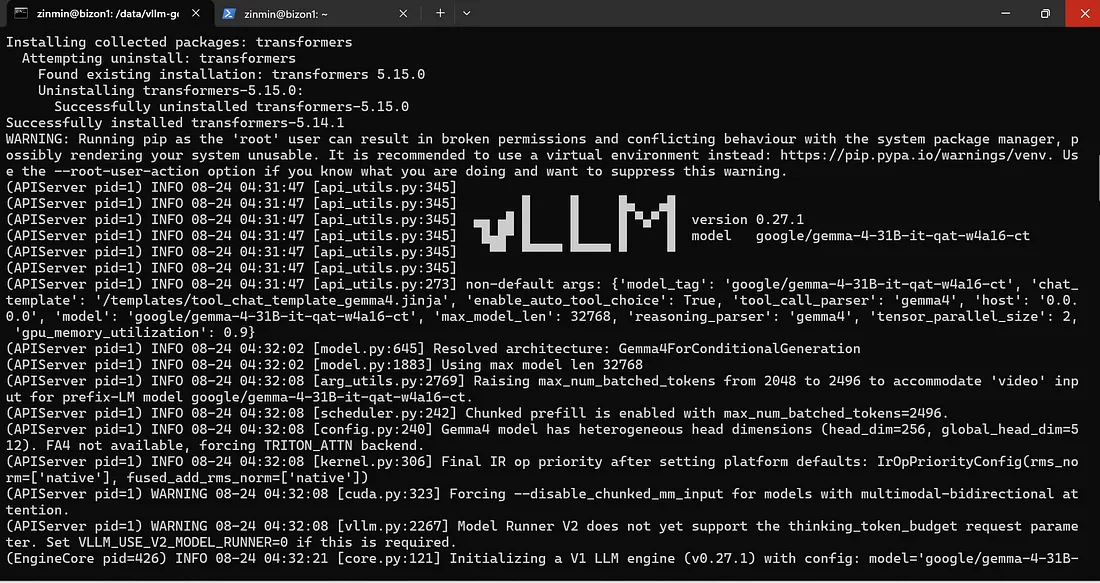
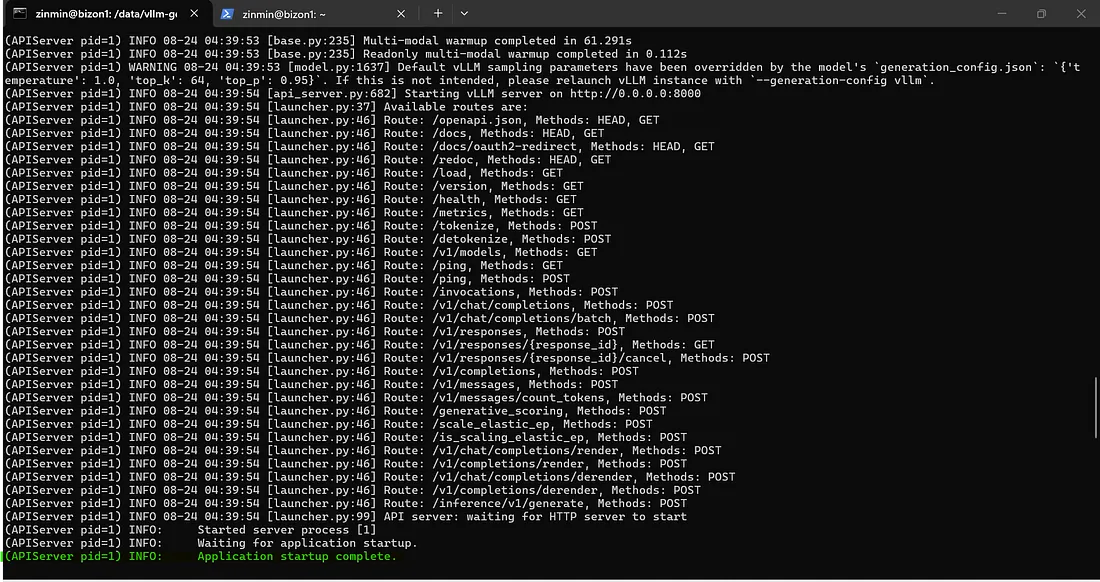
အဆုံးမှာ Application startup complete. ဆိုတာလေး မြင်ရရင် Deployment အောင်မြင်ပြီဆိုတဲ့ သဘောပါ။
vLLM Benchmark Test
vLLM မှာ Benchmark Test လုပ်ဖို့ bench serve ဆိုတဲ့ command လေး ပါပါတယ်။
အောက်က Docker command က context length ကို အမေးအတွက် 2048 စကားလုံး ၁၅၀၀ ကျော်လောက်သုံးပြီး အဖြေကို 512 စကားလုံး ၄၀၀ လောက်နဲ့ ပြန်ဖြေဖို့ သတ်မှတ်ထားပြီး max-concurrency ကို တစ်ကြိမ်မှာ တစ်ခါပဲ တွက်ချက်မယ်လို့ သတ်မှတ်ပြီး စမ်းတာပါ။
docker exec -it vllm-gemma4-31b \
vllm bench serve \
  --backend openai-chat \
  --base-url http://localhost:8000 \
  --endpoint /v1/chat/completions \
  --model google/gemma-4-31B-it-qat-w4a16-ct \
  --dataset-name random \
  --random-input-len 2048 \
  --random-output-len 512 \
  --num-prompts 20 \
  --request-rate inf \
  --max-concurrency 1 \
  --temperature 0
ကိုယ့်ရဲ့ လိုအပ်ချက်အပေါ်မူတည်ပြီး input-output token size နဲ့ max-concurrency တန်ဘိုးတွေကို အတိုးအလျော့ လုပ်ပြီး စမ်းနိုင်ပါတယ်။
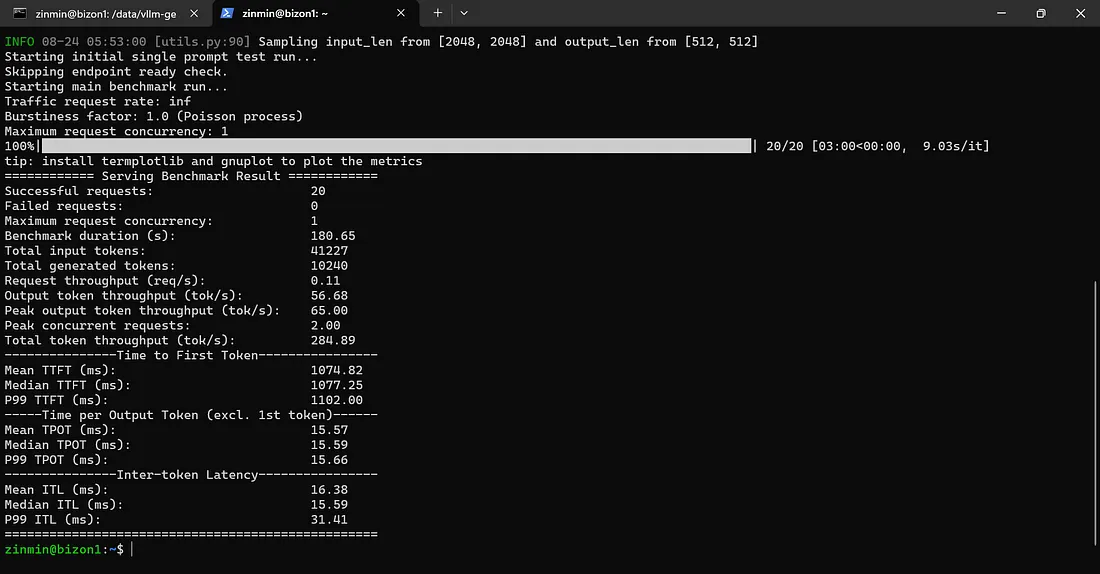
Benchmark ရလဒ် တန်ဘိုးတွေ အကြောင်းကို ရှင်းပြရရင်
Max Concurrency: တစ်ပြိုင်နက်တည်း (concurrently) လက်ခံတွက်ချက်ပေးနိုင်တဲ့ စုစုပေါင်း Request အများဆုံး ပမာဏဖြစ်ပါတယ်။
Benchmark Duration (s): Benchmark Request တွေ အကုန်လုံးပြီးအောင် စုစုပေါင်း ကြာသွားတဲ့ အချိန် (စက္ကန့်) ဖြစ်ပါတယ်။ ဒီတန်ဖိုး နည်းလေလေ၊ System ရဲ့ Processing Capacity ပိုကောင်းလေလေပါပဲ။
Request Throughput (req/s): Server က တစ်စက္ကန့်မှာ Request ဘယ်နှစ်ခုအထိ ပြီးမြောက်အောင် တွက်ပေးနိုင်လဲဆိုတဲ့ ပမာဏပါ။ ဒီတန်ဖိုး မြင့်လေလေ Server ရဲ့ Serving Capacity ပိုကြီးလေလေပါပဲ။
Output Throughput (tok/s): Server က အလုပ်လုပ်နေတဲ့ Request တွေ အားလုံးကနေ တစ်စက္ကန့်ကို Output Token စုစုပေါင်း ဘယ်လောက် ထုတ်ပေးနိုင်လဲဆိုတဲ့ တန်ဖိုးပါ။ ဒီတန်ဖိုး မြင့်လေလေ စုစုပေါင်း Generation Throughput ပိုကောင်းလေလေပေါ့။
Peak Output Throughput (tok/s): Benchmark လုပ်နေစဉ်အတွင်း Output Token ထွက်နှုန်း အမြင့်ဆုံး ရောက်သွားခဲ့တဲ့ စံချိန် (Peak capacity) ပါ။ ဒါက LLM ကို Agent တွေကဝိုင်းသုံးကြတဲ့ အခါ အမြင့်ဆုံးရနိုင်တဲ့ အခြေအနေကို ခန့်မှန်းနိုင်ဖို့ပါ။
Mean TTFT (ms): Time to First Token — မေးခွန်းမေးလိုက်တဲ့အခါ LLM ရဲ့ Response အတွက် ပထမဆုံး စကားလုံး စထွက်လာဖို့ စောင့်လိုက်ရတဲ့ ပျမ်းမျှ အချိန်ဖြစ်ပါတယ်။ TTFT နည်းလေလေ App က ပိုပြီး တုံ့ပြန်မှု မြန်ဆန်တယ် (responsive ဖြစ်တယ်) လို့ ခံစားရလေပါပဲ။
Mean TPOT (ms): Time Per Output Token — ပထမဆုံး Token ရဲ့ နောက်ကနေ နောက်ထပ် Token တစ်ခုချင်းစီ ထွက်လာဖို့ ကြာတဲ့ ပျမ်းမျှ အချိန်ဖြစ်ပါတယ်။ TPOT နည်းလေလေ အဖြေ ထွက်နှုန်း ပိုမြန်လေလေပါပဲ။
Mean ITL (ms): Inter-Token Latency — Stream လုပ်ပြီး ထွက်လာတဲ့ Output Token တစ်ခုနဲ့ တစ်ခုကြား ကြာသွားတဲ့ ပျမ်းမျှ ကြန့်ကြာချိန် (delay) ဖြစ်ပါတယ်။ ITL နည်းလေလေ စာတန်းတွေ ထွက်လာတာ ပိုငြိမ့်ပြီး ပိုမြန်တယ်လို့ ထင်ရလေပါပဲ။
အောက်က ဇယားကတော့ ကျွန်တော် စမ်းထားတဲ့ Benchmark Test ရလဒ်တွေပါ။
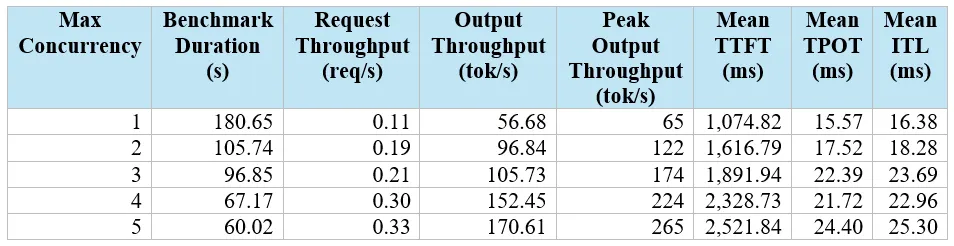
ကျွန်တော့် စက်အတွက် ရထားတဲ့ ရလဒ်တွေ အရတော့ vLLM ရဲ့ Continuous Batching ကို ကောင်းကောင်းတွေ့ရမှာပါ။
Total System Throughput မြင့်မားမှု - Concurrency ကို 1 ကနေ 5 ကို တိုးလိုက်တဲ့ အခါမှာ စုစုပေါင်း Output Token Throughput က 56.68 tok/s ကနေ 170.61 tok/s (၃ ဆနီးပါး) ထိ မြင့်တာပါ။ Peak Throughput ကိုကြည့်ရင် 265 tok/s အထိ ရောက်ခဲ့တာကို တွေ့ရမှာပါ။
User-perceived Latency ထိန်းသိမ်းနိုင်ခြင်း - Concurrent Request က 5 ခု အထိ တက်သွားပေမယ့်လည်း တစ်စက္ကန့်ကို Response Speed (TPOT) သည် 24.40 ms/tok (~41 tokens/sec per user) ရှိနေတာမို့ End-user ဘက်က အမြင်အရ LLM ရဲ့ စာပြန်နှုန်း အလွန်မြန်နေမှာပါ။
TTFT (Time to First Token) ၏ သဘောသဘာဝ - Concurrency တက်လာတာနဲ့ Prompt Prefill မှာ Queue ခဏ စောင့်ရပါတယ်။ TTFT က 1.07s မှ 2.52s ထိ မြင့်သွားပေမယ့် 2048 Context Length အတွက်ဆိုရင် 3s အောက်မှာပဲ ရှိတာမို့ Production Live Chat အတွက်ကတော့ Latency တော်တော်ကောင်းတယ် ပြောရမှာပါ။
Link to Open Web UI
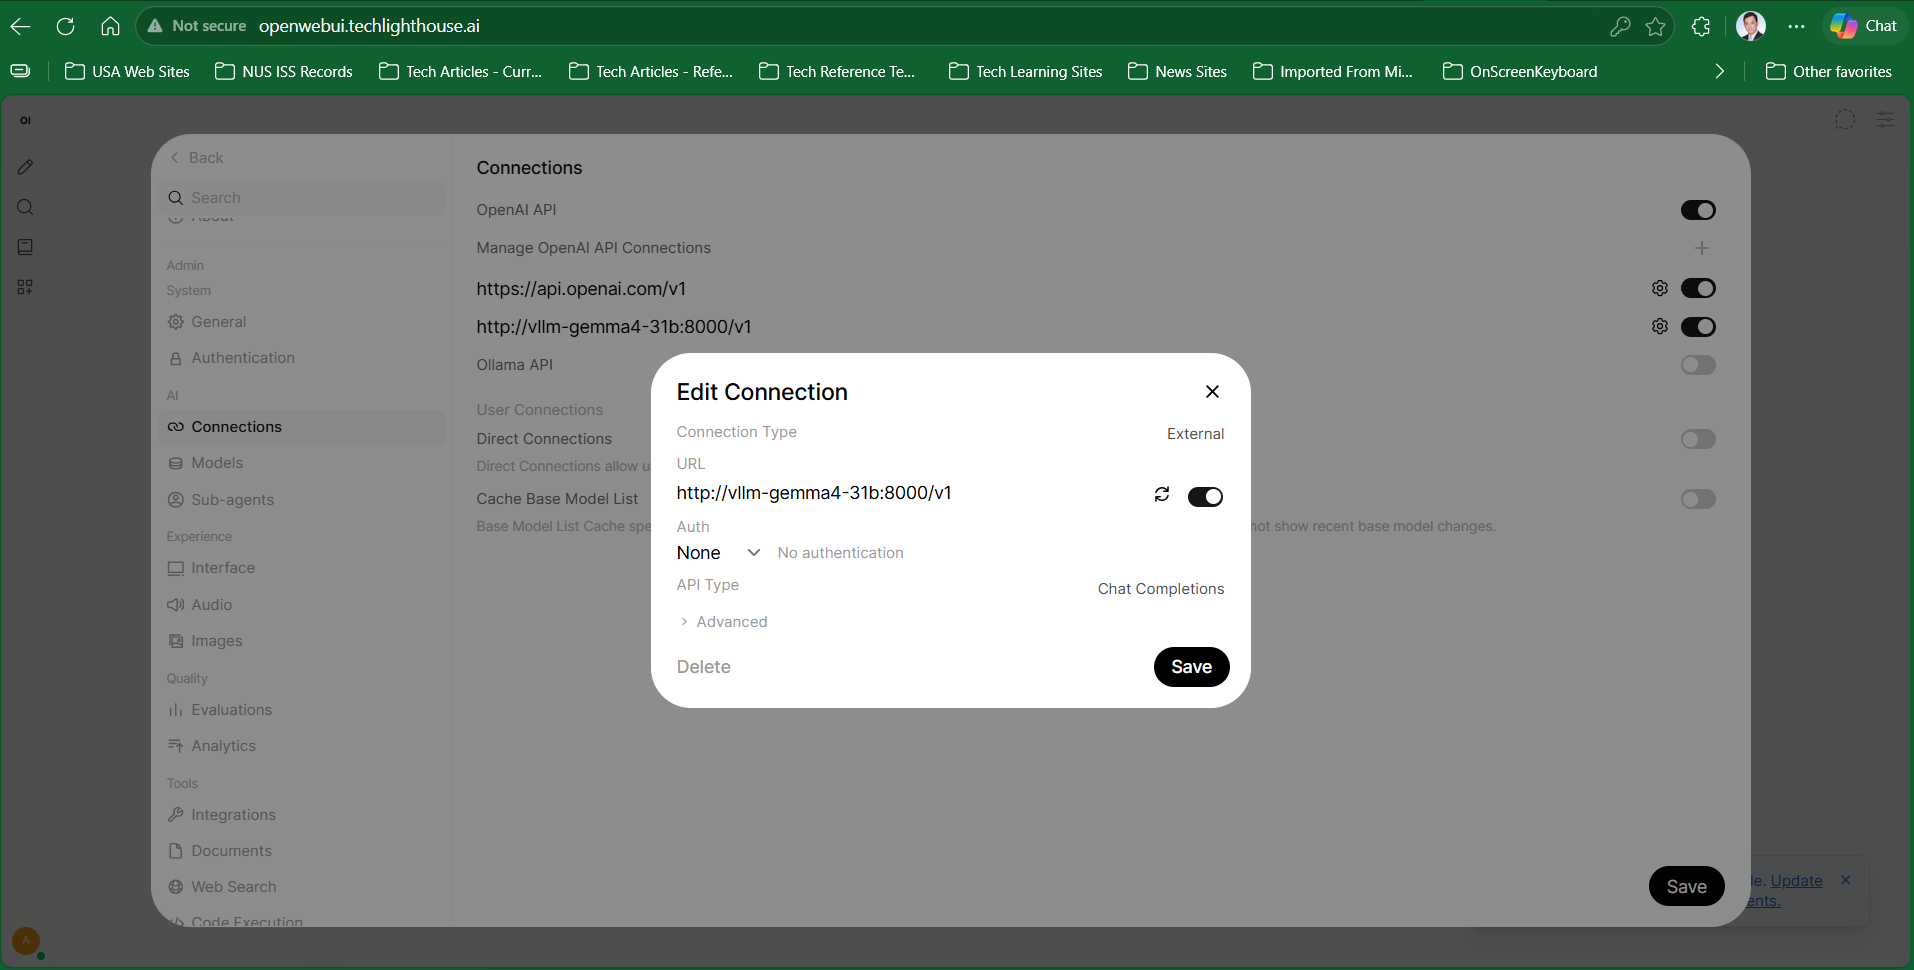
Open Web UI နဲ့ စမ်းဖို့ကတော့ Open Web UI ရဲ့ Setting > Connections မှာ vLLM container ရဲ့ EndPoint URL ကို ထည့်ပေး လိုက်ယုံပါပဲ။
Ollama လား vLLM လား
ကဲ အခုဆိုရင် AI Agent Engineer တစ်ယောက်အနေနဲ့ Local မှာ LLM တွေကို ဘယ်လို Run လို့ ရလဲ ဆိုတာ သိမယ်ထင်ပါတယ်။ များများသိ များများကျွမ်းကျင်ဖို့ များများ စမ်းတဲ့ အတွေ့အကြုံတော့ အရေးကြီးတာပေါ့။ လိုက်လုပ် လိုက်စမ်းကြည့်ပါ။
ရှေ့ တစ်ပါတ်မှာတော့ Azure AI Foundry တို့ GitHub တို့မှာ Model တွေ Deploy လုပ်တာ ပြောကြတာပေါ့။
အဲဒါတွေ ပြီးမှပဲ C# နဲ့ LLM တွေကို ဘယ်လိုချိပ်ပြီး Agent ရေးမလဲ ဆိုတာ ပြောမယ်စဥ်းစားထားတယ်။
လေးစားစွာဖြင့်
ဇင်မင်း